
The most important thing I have learned about the Accuquilt Go! Baby is that it isn’t just designed for cutting a whole quilt or larger project … oh no!
My initial fear about using any kind of cutting machine was that anything I made would look just too anodyne and perfect (fat chance!) When I twigged that it's the sewing and embroidery that defines my stitching, not what I use to cut the fabric, it all fell into place.

Once the novelty of cutting bulk circles & hexies
& squares out of scraps (for the sheer joy of it) had worn off, I realised I had a tool that affords me the time to actually try new things out - because I know that I’m approaching the task from a starting point of accuracy.

<-- For this tutorial I was inspired by this brill nerdy mug rug from Lillian’sStitches over on Flickr.
Even though there’s only one hexagon to cut, I wanted to make a few of these for nerdy sciencey mates & colleagues, so it was a great Go! Baby project.
I also had to cut pentagons, which I did using my lazy laptop-screen lightbox method:
- find an image on the interweb
- resize it in the browser using Ctrl + or - (the keyboard shortcut makes your whole browser magnify or diminish incrementally - blurry handy!)
- using tracing paper or template plastic and sticky tape if you feel you need it (get rid of some of the sticky on some batting first to keep your screen clean) trace image off laptop screen with a fine marker.
- cut with old fashioned scissors. carefully.

I was a bad girl (I’m sure it’s not recommended) and also cut a piece of template plastic using the Go! Baby for the 1” hexagons. I really wanted to fussy cut neatly as they’re so small.
Here’s what you need for the molecule mug rug (click on image to enlarge on flickr)

in case you can’t read the measurements, the front and wadding pieces are 9” x 7” and the backing (and self-binding) is 10.5” x 8”.
I found some mug clipart (for the other side) and traced that off the screen too, straight onto bondaweb.

I also traced it onto paper using a marker, so that I could flip it for the reverse image, and add to my other applique templates. I used red and green fabric for the mugs to make it a little more Christmassy.
Quick scrawl of caffeine molecule (also traced off screen) ...

Next, iron the applique pieces onto front and back pieces.

Either machine or hand applique (I forgot to photograph that bit!)

Embroider your molecular connecty bits …
Lay backing wrong side up, batting and front right side up and baste.


To self-bind, fold backing over twice, as for hemming, and press with an iron.
Pin and sew as you would for binding - I didn’t mitre my corners here, I wanted them square and blocky:

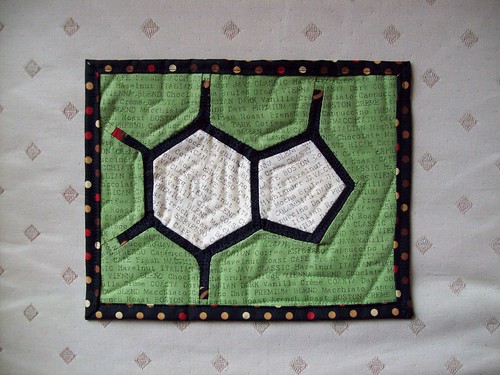
Ta Da! One Caffeine Molecule Mug Rug!

 I hope you feel inspired to run up a few of your own … if you do, please add them to my squeaky new and very empty Pings And Needles Tutorial Stuff Flickr group
 (Bwahaha .. PANTS for short!) I’d love to see what you make!
I'd really really love it if you used it like a kind of permanent linky group for any quick and easy tutorials that you do ... We can get organised in the Discussions, but just adding pictures to the Pool that link to tutes would be fantastic ...