Happy Thanksgiving to all of you across the pond, here in the UK and in fact anywhere in the world …
I love the idea of Thanksgiving (bar the turkey, cos it's just rank, sorry - I'm with Katy on that one).
I think we should make more of being thankful here in the UK but we’re all a bit up our own arses - call it stiff lower lip if you will ...
Anyway ...
A couple of days ago I received a wonderful package from Aneela Hoey @ comfort stitching of some Quilt Market scraps from her new ‘A Walk In the Woods’ line (well about a ton actually) which I wasn’t going to show until way closer to its release date … but listen up guys … this is one gal who may suddenly have come under the spell of the toadstool after years of meh-ness!
Foxes? Who wouldn’t love them? I have an almost obsessive love of 'em ...
But really, me? toadstools? …. mmm hmmm … I think I’ve moved along apace … (I will never openly admit I love cute though, right?!)
And if that wasn’t enough … Today I came home from a tiring day at work after horrid doctor’s prodding around yesterday to what is fast becoming a tradition in the Pings household. (sorry about the lazy in-bed photo, which in no way does justice to the colours … but I’m pooped.)
… the scraps from Melody Miller’s Quilt Market table, of her new line Ruby Star Shining … just heaven. Oh Melody. Typewriters, clocks, coffee pots, flubbers? swoon and weep.
Both of these fabric lines are soft and beautifully buttery, inviting touch and love and desire to sew.
Thank you ladies. I am truly lucky and truly thankful to have made such wonderful online friends.
Love to you and yours, wherever they may be … n'night!
THIS GIVEAWAY IS NOW CLOSED - THANK YOU! - WINNER TBA SOOOON!
So far you may have seen my wristwatch & mince pie pincushion tutorials earlier this week, and I have some more in the pipeline using the hexie die and loads more with circles.
But that’s for another day.
I really can’t thank you all enough for being such loyal followers and commenters on this little blog. Since the end of the summer I haven’t had the chance to post [or sew] half as much as I’d planned, and I’m sorry about that. I’ve had a tough few months and thanks to the lovely people at Accuquilt, at least I can go some way to paying one lucky winner back!
Well, you didn’t think I was going to keep all that yummy Accuquilt Go! cutting to myself did you?
Would you like to win an AccuQuilt GO! Baby fabric cutter + 3 dies of your choice?
I based my choice of dies on things that I find a real faff to cut, but I’m really regretting not getting the big 1/2 square triangles die, and as soon as I get paid this month, I’ll be investing in that one too.
Go and have a look on the AccuQuilt GO! site. They have some great new dies in stock now. Also they have live online advisers who are sooooo helpful.
Here's how to enter the giveaway - No real hoops here:
1. Go over to the AccuQuilt GO! Shop and choose your 3 favourite dies for the GO! Baby.
The links take you to dies that are compatible with the Baby. Then come back and leave me a comment telling me which ones you would like if you won. Please Note: If you don’t tell me which dies you want, then your entry won’t count. Simple as.
2. For an extra entry, blog about my giveaway - feel free to use the pic on this post.
3. If you'd like a 3rd entry, tweet about the giveaway. Please include @pingsandneedles in your tweet. Then come back and leave me a comment with your twitter @name.
This giveaway is open internationally and will run until midnight UK time Thursday 1st December - leaving you plenty of time to receive your prize and rustle up a few Crimbo gifts … The winner will be announced here on this blog.
Even if you don’t have a Go! Baby, you can still get this great set of 22 patterns free
… some of them are really not half bad you know … I clicked through one of the many many many times I entered giveaways (unsuccessfully LOL) on other blogs and I have actually used a couple of the patterns. You get em when you sign up to their newsletter. Not such a hardship really.
Give it a go!
(I think if you click using this link I may get bonus brownie points or something … I’m not sure … Either that or they just work out how many clickthroughs I generate … just sayin …)
Good Luck! xx
THIS GIVEAWAY IS NOW CLOSED - THANK YOU! - WINNER TBA SOOOON!
So, following on from yesterday’s post, may I present the mince pie wrist pincushion!
This one came about when I was sewing the perle thread edging on my wristwatch pincushion - it reminded me of the crimping round a mince pie! (It was teatime too, and I was feeling a tad peckish) so I just made one to see if it worked! I really like it … a bit of festive silliness!
This one is even easier and faster to make than the last … no transfer printing, just plain felt, a bit of ribbon, a brown marker and a tea bag!
You will need:
2 x 3” circles of white felt
2 holly leaves and 3 berries cut from felt
neutral sewing thread (I used my Aurifil)
some caramel coloured Perle thread
A brown permanent marker pen (I used a Sharpie)
some rice for the filling
2 scraps of velcro
10” piece of twill or ribbon - edited to add ..
the ribbon is from Clothkits here ...
First cut your circles … If you have an Accuquilt Go! Baby then you know how easy this is!
Equally - if, unlike me, you are good with scissors - it shouldn’t be too taxing!
Next, you need to just go round the edges of your holly shapes very gently with a brown marker (I cut mine freehand, but you can find clipart here) and then make some little crimping marks round the top circle.
Then sew your holly shapes onto your top piece with the caramel Perle thread …
Now sew your ribbon/twill down the middle of the back piece (that middle section will be covered by the top piece.
You can sew your velcro on now,
or wait until it’s stuffed (don’t trim the length until it’s finished as you could end up with a tight fit!)
Then pin and sew the two pieces together, along the line of your ‘crimping’ marks.
Again, I used backstitch.
Leave a gap for the stuffing!
Fill with rice (quite puffy this time, as it’s a pie!) and sew up the gap.
It should look like this:
Now you need to go round again, this time with the Perle thread in a kind of reverse blanket stitch.
You can leave it like that -
But if you like your mince pies with a bit of a higher bake, then just get a cold tea bag and daub it gently over the surface of your pie … build up the colour slowly … less is more.
I actually used a bit of felt dipped in my cup of coffee because I was lazy!
Ta-Da!
I think these would make really sweet stocking fillers for stitchy friends ... Do let me know if you make one!
Next up is a nerdy mug rug ... here's a sneaky peek ...
p.s. I could give you a tutorial for a pincushion ring too, if you fancy it ....
p.p.s. don't worry - apparently things are looking up - according to my Spam folder I'm just about to share a $20,000,000 legacy with an oesophageal cancer sufferer in Nigeria ... who knew?
So, here we are with the first of two wrist pincushion tutorials - a watch AND a mince pie!
Let’s start with the watch today …
I made one of these back in March to go with a little giveaway and I can’t tell you how impossible I found it to cut two circles out of fabric. Pathetic. Really! I must have cut about 8 circles before I got a pair I liked.
Not now.
Oh no.
This time I’m using the Accuquilt Go! Baby for these little cuties … And boy oh boy is it easier! Now, if you don’t have one, it’s still easy enough, I’m sure, for you to cut two 3” circles. It’s just me who finds it impossible!
First off you will need a good clock image to print onto T-shirt transfer paper … (remember to reverse the image when you print or it will come out backwards!) You should find it in your printer settings …
You can use this picture by right clicking and saving it to disk:
I printed 8 onto a sheet of A4 paper (if you’re using something like Word, insert a table and then paste the image into each cell - that way you get really good spacing)
Then cut round your transfer leaving a little white space around the edge (it makes it easier to peel the paper off after you’ve ironed it on)
Then you will need:
1 x transfer print of watch face
2 x 3” felt or fabric circles
1 x 10” piece of ribbon or twill
2 x scraps of velcro
rice for the filling
standard sewing thread (I used my Aurifil)
red & green embroidery thread/perle for edging (optional)
I used a heavy off white felt that I got from my linen man (He’s not made of linen, he just sells it) … It’s 100% wool, ex-Ministry of Defence stuff (used for lining uniform collars apparently!!)
I put two scraps of felt onto the middle (3”) die and then rolled it through … sooooo easy!
Iron your transfer onto one of the circles.
You should now have one front (watch face) and one back piece …
Take your back piece and sew your twill/bias/ribbon down the middle …
… This will be the inside back.
You can sew your velcro on now (one on each end, opposite sides of tape … or you can wait until you have stuffed it to get a better idea of the length needed!
Then place your watch front piece on top (right side up) and sew the two pieces together, leaving a gap of about 2 inches for stuffing … I used a back stitch about 1/8” in from the edge …
Now fill your watch! It doesn’t have to be very full (as it’s a watch and all).
Then sew up your gap and you're ready to rock and roll!
Once I’d sewn it up I decided to make it a bit more festive with some red and green perle (threaded together in same needle).
… and that, as they say, is that! It honestly took twice as long to write the tutorial as it did to make the pincushion!
… Don’t forget to come back tomorrow for the mince pie! It was inspired by that crimping look made by the embroidery thread!
Sorry if you got a little sneak peek of the 2nd (mince pie pincushion) tutorial in your Readers ... my finger slipped on the publish button while I was editing it!
All will be revealed on Tuesday ... Tomorrow it's the watch!
Instead, feast yer eyes on this stonking meringue (filled with warm caramelised raspberries and cream!!) which I had for lunch yesterday at a friend's house!
Look what I found propped up against my front door when I got home from work the other evening …!!!!
Those jolly lovely people over at Accuquilt have sent me a Go! Baby cutter and three dies to play with review and do some tutorials for!
Accordingly, I’ve got quite a few tutorials lined up for you over the next couple of weeks - a mug rug or two, a pet bed with a twist, a couple of wrist pincushions and some funky Christmas placemats/lap napkins.
One of you lucky people could just find yourself with an early pressie too … but more of that another day …
... Just in time for Christmas too!
This has caused great excitement chez Pings …
I went for the 2.5” strips, Hexagons
(2”, 3” & 5”) and Circles (2”, 3” & 5”).
My reasoning behind this was that I wanted to be able to cut endless binding, 2.5” squares and diamonds from the strip cutter, as well as shapes that I find tricky to cut in multiples.
I have quite a clicky wrist, so hexie cutting with a rotary cutter is a real no no for me. And I’m like a 4 year old when I try to cut circles!
Today’s post is really just a little play and a review of how well it works.
The first thing I wanted to see was how easy it would be to cut squares using the strip cutter. I already had some 2.5” strips in my scrap basket, so I just folded one and laid it at right angles to the strip on the die …
Then I placed the cutting mat on top ….
and rolled the whole kit and kaboodle through the machine … easy peasy …
I only rolled the end part through the mat and then rolled it back (you can roll the sheets forwards and backwards, which is really really useful when you’re cutting multiple layers of thicker fabrics and need a bit more cutting oomph).
You don’t need to use any pressure and the handle is really easy to turn. This is great for anyone who has wrist problems, like me. I know Accuquilt don’t use this as a selling point, but in MY case it really doesn’t put my wrist under anywhere near the same pressure as when I use a rotary cutter.
Voila! 5 perfect little squares! (the edges are a bit raggedy because the strip was in my scrap basket and I didn’t iron my fabric first - I did this within 5 minutes of opening the box - I just couldn’t wait!)
Test one - Tick!
Then I cut some 2.5 strips to use as binding for my Bletchley Quilt (more of that another day).
The great thing about the strip die is that it is open at both short ends, so that you can cut really long lengths. I do recommend ironing your fabric first and taking the time to line it up straight on the die, or you will get the same little kinks you get when you rotary cut folded strips.
The wastage really is minimal if you cut your fabric to size first - just one skinny strip (you could even use this for gift wrapping!)
Test two - Tick!
Then, I couldn’t resist cutting some 2” circles out of one of the strips … I did have to snip one thread that hadn’t cut through all the layers, but that’s not such a hardship really.
Test three - Tick!
My only real criticism of the whole kit is that the cutting mats are not that durable and not remotely self-healing! It would have been nice to have been sent two of the short cutting mats to go with the circle and hexagon dies, rather than only one. Even though you can use both sides, they will wear out pretty fast and they cost about £10.50 to replace. Within the first hour of use and after maybe only 10 or 15 passes, the cutting mat looked like this:
It helps to pull any lint-y thread out of the grooves with some tweezers.
The red circles you can see are from some really thick felt that I cut for my poppy day brooch.
You should also clear the die of any threads too. I use one of those rubbery clothes brushes … works a treat!
That’s really a very small criticism of something that will make cutting sooooo much faster and more accurate. I have to say that I absolutely L-O-V-E it and my only problem now is the number of ideas I have for projects! That’s not a bad problem to have, especially as the cutting is very often what makes me procrastinate more than anything else!
The next couple of posts will be tutorials for really quick and easy to make wrist pincushions!
… here’s a teensie sneaky peek:
What delights have come through your door this week?
How are your weekends going? Nearly gone? Horrid isn’t it!?! …
One of you randomly picked voters from the Japanese Scrap Bag Challenge might just have a little postpone Monday happy dance, as I will be sending you a little scrap bag of my own:
So, Congratulations to:
Jan at Isisjem, who commented:
"Hadley’s School tags should win because they are different but useful to many people and applications. Eilidh’s diamond scrappy stocking should win because it looks so fine and has a lovely story to go with it. Ali of VeryBerry boy and girl bootees are just too darn cute not to win. I actually want some adult slippers just like them. "
.. couldn’t agree more Jan, and I love that you picked the first three in reverse order! Kismet.
Please email me your address details and I’ll get a little something in the post to you …
In other exciting news … have you read this? Yes! Lynne@Lily’s has joined the Fat Quarterly team! That’s like Inspiration Overload! … Congratulations Lynne!
I buy lots of poppies from the Royal British Legion every year - I like the big silky ones best.
For me, Remembrance Day is something I find almost unbearably moving and this year it’s 11am on 11th November 2011 … that’s 11:11:11:11 so it touches my nerdy soul too … woot!
This year I decided to make a blingy one for work too … I cut two different sized circles of felt and then shaped them into a couple of squashed 8s …
I beaded round the edges in pink, purple & red and used an old Victorian jet mourning button for the centre. I like that link of remembrance.
Nothing exciting round the back - just a safety pin ..
So, at 11:00am on Friday I will be wearing my poppy and keeping the silence, even though it’s break time at school and all will be loud and chaotic around me. I may need to go and hide in the loo to do it though!
I like that reflective quiet time ... I don't think we have enough of it in our jam packed lives ...
Months of crafting and snapping and posting and commenting are over.
The votes are in and have been counted. I was absolutely meticulous about this and discarded a few votes that had been entered more than once and took the total over three ... In kindness, let’s say that was just over enthusiasm on the part of some voters … no vote fixing here, my friends … oh no ...
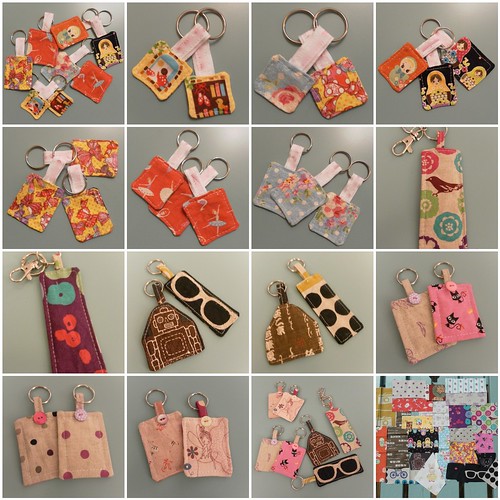
The Japanese Scrap Bag Challenge gauntlet was enthusiastically and creatively taken up by The Magnificent Nine:
A. Hadley - school tags
B. Emily - sandwich bag
C. Bianca - japanophile muff
D. Beth - Pleat front Sorbetto top
E. Alli - eating out pouch
F. Ella - belly dancing corset and bra trim
G. Sarah - tic tac toe & puzzle
H. Eilidh - diamond scrappy stocking
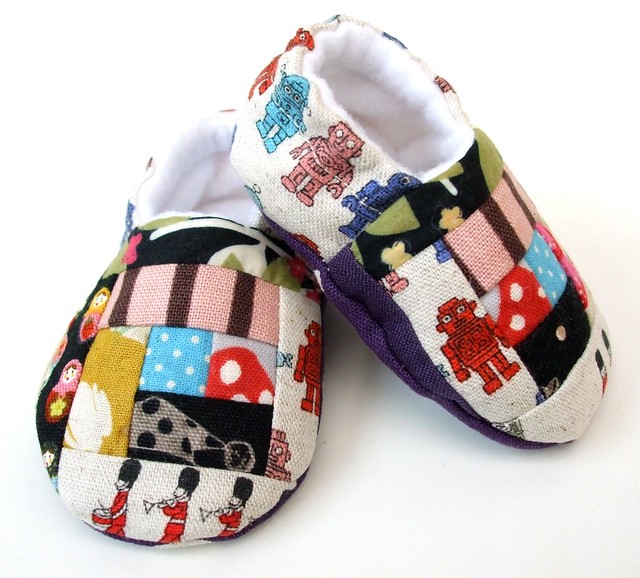
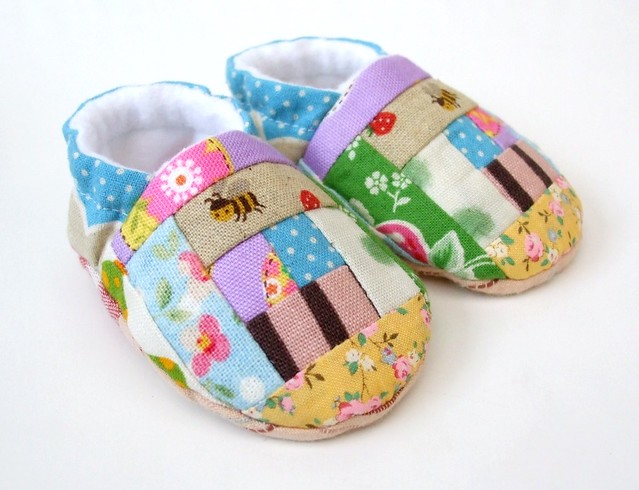
I. Ali VeryBerry - boy & girl bootees
Only one couple have danced their way to earn the right to lift the mirrorball. (Sorry, seem to be channelling Strictly …)
Goodness me! It was a close run thing … A total of 372 votes !!
It was vay vay exciting checking the spreadsheet to see how things were going - every day the Top 3 changed!
So, in customary style, let’s go in reverse order ….
Congratulations Ali! - you get to wear the crown and sash as 2011 Eternal Pings Scrap Bag Challenge Queen ... you will be receiving a year’s subscription to the Eternal Maker’s Japanese Swatch Club.
Thank you so so much to everyone who took part with such wonderful enthusiasm and creativity. You’re all winners …. man …. Thank you too to Anna at The Eternal Maker for suggesting and sponsoring the challenge! You all rock!
Tomorrow I’ll announce my voter giveaway winner, but for today, let’s just drool over those bootees again … after all, that’s exactly what the babies will be doing! Bwahaha!


 I buy lots of poppies from the